Mulesoft is one of the most useful technological tools on the market when it comes to data integration and connectors. It is capable of integrating various web applications and software in one place, even offering the possibility of custom connectors working with Anypoint Connectors.
Anypoint Connectors is a Mulesoft feature that provides its users with the ability to create a connection between a Mule stream and an external system, such as a content source or database. In addition to this, in parallel to the already ready connectors that you have available to use, you can create a custom one that best suits the needs of the project.
It may be that sometimes the correct connector is not found to integrate the systems or the one that ends up being chosen eventually does not have the necessary functionalities to keep up with the passage of time, so it needs to be changed and thus have to work extra.
Create custom connector in Mulesoft
Before explaining the build steps, you should be familiar with Anypoint Studio 7+ and have the JDK, Anypoint Studio 7+, and Maven versions installed.
Now yes, to create the connector you must execute the following command in the symbol where you want to create the project. Since it cannot be done from Anypoint Studio, a Maven archetype must be used.
Step 1: Open command prompt/git bash where you want to create the project and run the following command as shown below:
mvn org.mule.extensions:mule-extensions-archetype-maven-plugin:generate
Step 2: Configuration
After executing the above command, it will ask you to configure the following:
- Extension name
- Extension group ID
- Extension Artifact ID
- Extension version
- Main extension package
These data must be provided in this way:
- Extension name: DemoConnector
- Extension group ID: com.Demo.muleConnector
- Extension artifact: mulesoft-demo-connector
- Extension version: 1.0.0
- Main extension package: org.mule.extension.Demo
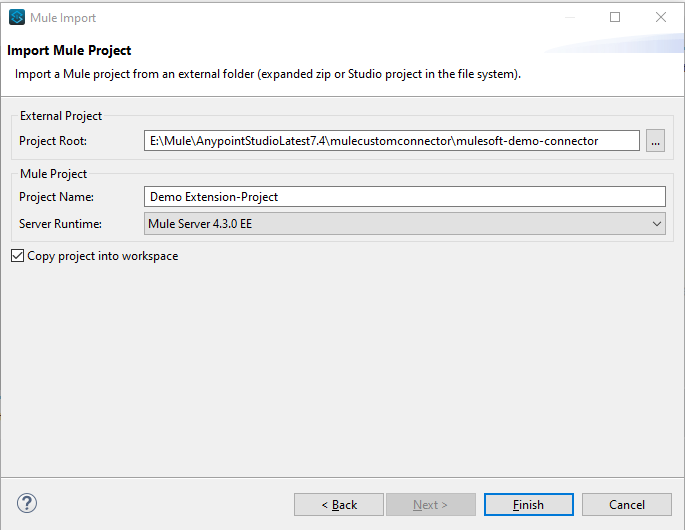
Step 3: Import
In this step, you should import the project to your workplace.
Step 4: Install the project
After the project has been imported, go to the workspace and run this command to build the jar:
mvn clean install –DskipTests
Step 5: Update the dependencies
The user should now go to the Mule application where the connector will be installed and update the dependency as follows:
<dependency>
<groupId> com.Demo.muleConnector</groupId>
<artifactId> mulesoft-demo-connector</artifactId>
<version>1.0.0</version>
<classifier>mule-plugin</classifier>
</dependency>
Step 6: Mule Palette
After adding the dependency, click save so that the plugin is added to the Mule palette. So:

Step 7: Install Connector
The next step is to add the version of the connector in the application pom.xml where you want to install the connector and save it so that it is updated and can be displayed as follows:
<?xml version="1.0" encoding="UTF-8" standalone="no"?>
<project
xmlns:xsi="http://www.w3.org/2001/XMLSchema-instance"
xsi:schemaLocation="http://maven.apache.org/POM/4.0.0 http://maven.apache.org/xsd/maven-4.0.0.xsd">
<modelVersion>4.0.0</modelVersion>
<groupId>com.Demo.muleConnector</groupId>
<artifactId>mulesoft-demo-connector</artifactId>
<version>1.0.1 </version>
<packaging>mule-extension</packaging>
<name>Demo Extension-Project</name>
<parent>
<groupId>org.mule.extensions</groupId>
<artifactId>mule-modules-parent</artifactId>
<version>1.1.3</version>
</parent>
</project>
Step 8: Custom Connector Configuration
To create configuration in the custom connector, the following steps must be followed:
/**
* Example of an operation that uses the configuration and a connection instance to perform some action.
*/
@MediaType(value = ANY, strict = false)
public String retrieveInfo(@Config DemoConfiguration configuration, @Connection DemoConnection connection){
return "Using Configuration [" + configuration.getConfigId() + "] with Connection id [" + connection.getId() + "]";
}
Step 9: Creating Configuration and Connection Classes
There is one field for settings and two fields for connection classes, and they can be created as follows:
Setting:
/**
* This class represents an extension configuration, values set in this class are commonly used across multiple
* operations since they represent something core from the extension.
*/
@Operations(DemoOperations.class)
@ConnectionProviders(DemoConnectionProvider.class)
public class DemoConfiguration {
@Parameter
private String configId;
public String getConfigId(){
return configId;
}
}
Connection classes:
/**
* A parameter that is always required to be configured.
*/
@Parameter
private String requiredParameter;
/**
* A parameter that is not required to be configured by the user.
*/
@DisplayName("FriendlyName")
@Parameter
@Optional(defaultValue = "100")
private int optionalParameter;
This way it is possible to create a custom connector with Mulesoft.
We recommend you on video


